Life on a little urban homestead in the making, with ideas for self-sufficiency, Permaculture, DIYing, organic gardening, food preservation, Chicken keeping, cookery, crafts, thrifting and more...

May 30, 2020

New Chicks! Summer Veggie Garden Planted, DIY Recycled Cedar Planter, Fermenting Success


New Chicks! 
It's 96 today and hot! Summer is here finally, but going to drop 20 degrees tomorrow which will be nice. When we lost two of our hens last year I decided to buy some chicks this spring. I've learned the hard way not to buy them too early in the spring or they have to be inside a long time until they feather out and can tolerate outside temperatures. I called the local Hatchery and during the Covid-19 craziness everyone was sold out. Panic buying I think. I like to buy mine directly from a hatchery because they have a good variety, their chicks are healthy, and you know what you're buying. I've had trouble at two different local feed stores getting the wrong breed and one wasn't even a chicken! The good news was the hatchery was able to take an order a month out from me. So basically ordered three chicks mid late April for late May. I took a little vacation time on Wednesday, went out and picked up the chicks. These are pullets which mean they are baby hens. One is a brown leghorn (no name yet), one is a Silver Laced Wyandotte which I have named Luna, the other is a Red Sex Link Debbie. They LOVE the mirror in the basket! All happy and healthy under their red heat lamp-


Luna in the middle named for her silver color to come, brown leghorn on the right. Debbie on the left named for the space-faring chicken in the new Lost In Space-

Lucky Debbie with Don West (actor Ignacio Serricchio), resident hunk!

I'll start getting them outside soon, depending on the weather and then integrate them to the flock slowly. Happy to have more girls to add! More eggs on the horizon, will probably start selling some eventually. My post here shows the photos of adult hens colors,  New Chicks Coming!


Summer Veggie Garden Planted-
After a really bizarre April and May we finally got all of the summer veggies planted that we had on Memorial Day. We didn't have enough tomato cages so I asked Dave to rip some old cedar boards to create tepees for the tomatoes. He did that and it worked out great!

Dave used our thrifted mini table saw, works great! 


I bought some new rabbit fencing to put around the base of the tomatoes and peppers. This works as a cage for the tomatoes and keeps the chickens out. It's easy to manipulate, cut, and stores well. I realized ours was about seven or eight years old and was just a mess. So for two rolls for $25 it was a good solution-


After my fail X 2 with seeds in the cold frame I added purple and green cabbages and Kohlrabi's-


Mr bushytail chilling in the heat! 

I'm thrilled my French Lavender topiary survived the winter, under four layers of row cover. It's now covered with flowers, just starting to open!!!


Speaking of summer, we had our first barbecue in a few years! I kept forgetting to bring it out (in garage), but we had yummy burgers, grilled green onions, chips and lots of veggies!


And speaking of more summer, I put out some sunny yellow decor in the kitchen/dining room-


DIY Recycled Cedar Planter-
Since we still have some cedar lumber left after the veggie stakes were cut, I asked Dave to build another flower box for me. He asked how big and off he went-


I just need to add the basil starts and flowers, weather proof, perfect!


Fermenting Success-
I made two batches of fermented foods, one with my new Masontops kit. The first batch I used their sauerkraut recipe and my existing jar with airlock top. The second batch I made was fermented carrots with fresh thin sliced ginger and garlic. I was really excited to make two batches simultaneously! Mid way the kraut had a little bit of stuff on the top, but not much, so I skimmed it off. I also added a little bit more brine. I think the issue was some of the tiny pieces of cabbage floated up above the weights. Next time I will leave in a large cabbage leaf under the weights. Never had this problem with the Curtido, I think there was more mass. When it was done there was what looked like a Scoby on top, similar to what you see on top of Kombucha. It had no odor so I threw it out. I checked on the sauerkraut which tasted fine! Since I'm really only making it for myself I'm not worried about any kind of problems. I ate some and it was nice and crunchy! The carrots came out well, with a little tiny bit of scum on the top of the brine which I skimmed off. I tasted the carrots and they were crunchy and slightly spicy. The fresh raw ginger and fresh raw garlic definitely gives it some kick! I will definitely do those recipes again.


Carrots going in

top on, worked great venting! 

Close up 


Chilling in the fridge, the brine will get clearer in a few days

May 27, 2020

Rain Rain Went Away! New DIY Walk Way Done


Rain, Rain Went Away!
The weather the last month or two has been kind of crazy. We had warm weather (87),  then cold, (38) then warm, then cold, then cold. Last Wednesday we had record-breaking rain, 1.2 in in the Boise area. I was working that day from home and looking out thinking maybe our house was going to start rising and float away! My poor seedlings almost drowned-


I put the chickens in mid-morning because they were soaked, locked up the coop and gave them a snack-


I figured two hours later I could let them out, but it was still pouring!!! Finally about 5:00 pm or so it started drying up and I let them out. Everything was super saturated. The rain stopped the next day, just a sprinkling. The low Thursday was supposed to be 38 degrees. Yes you read that right 38 freaking degrees at the end of May. There is something wrong with this picture. We covered up our tomatoes and peppers that were outside already. I'm really glad we didn't plant everything else at that point. It's in the 70's this week, 81 today so hopefully this is the end of the cold rainy weather. However one never knows. I don't feel too bad as I know people in the Midwest and the East Coast are getting slammed by tornadoes, floods, etc. Other sad news is it appears there is only a handful of peaches on our peach tree. I suspect one of the evenings when it dipped into the 20's after the tree has blossomed pretty well killed most of them. The good news is we have lots of apples and lots of pears! I think I have a few frozen peaches left from last year, so I may hold out on those as long as possible.


New DIY Walk Way Done-
Last December we went and visited my husband's family in Portland, Oregon. We saw how my brother-in-law had his garden path redone in his backyard with crushed stone. We had a high-traffic pathway of round pea gravel on the north side of our house that is always a mess, even with all of the pavers we added years ago. Sadly round pea gravel moves around a lot-


buried pavers


Dave always wanted to redo it with something else and we went back and forth about what to use? One of the problems with the pea gravel it was always moving around making it a pain to take out wheelbarrows, mower,  garbage, recycling and city composting. Then there's bringing things in! After I saw the material that my brother-in-law had installed I told Dave that's what we should use! The same exact materials weren't available here. It was actually a lot cheaper than most of the other materials we could have bought, the whole thing came around $300.00 for three yards and renting a small and large tamper. We felt it was a good home investment for the long term. We rented a small tamper to basically smash the stone into place for compaction-


It was for the long stretch on the North side of the house, the small area in front of the gate going into that, and the entrance going into the veggie garden. We had the delivery done Friday as Dave took the day off. The broken edges of the crushed stone are really key as once it is laid down, tamped and watered as it won't go anywhere. We will be reusing the pavers somewhere else, possibly is the floor for the new coop we're thinking about building. Nice thing about crushed stone is it also lets the water go through it. It's permeable. It's also slightly rough so if it gets icy on that side of the house, which it occasionally does, we will still have good traction.

Here's the steps to doing this- First measure the area several times. Figure out how many yards you'll need, price, color, etc. It pays to shop around! We scheduled delivery since the truck we could borrow couldn't handle 4 tons! There are online converters to convert from square feed to yards. Here's the prep...

First remove the old gravel and soil-


 Most of the excess soil went into the various flower and veggie beds-


Next decide on your edging, we chose pressure treated wood, nice and natural looking. Measure and cut your lengths-


Temporary storage
Build and install your edging, using common galvanized nails, we used survey stakes, cheap and re-usable in the garden. They hold the edging in place, once stone's in you can pull them out -


Level as best as you can-


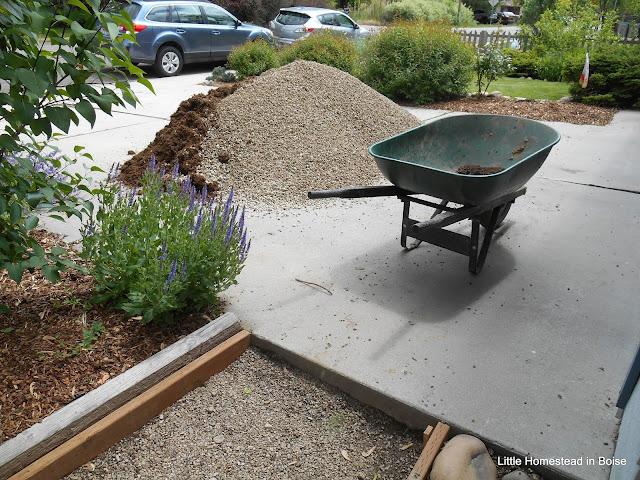
Delivery time!!!


We also got some shredded bark in the mix, oh joy! 


Dave separated the mulch as best he could, there was much more than we thought!

I did call the stone place we bought the rock from and complained that we wound up having 2 large garbage totes full of the mulch! I let them know we weren't very happy. Driver should have checked his truck before loading, wound up being a real mess! 


Next start adding rock to the path, rake as you go, after doing half water well. Next tamp down, do other 1/2. Water and tamp down again!


Dave did the entrance to the garden and then the entrance into the coop, both of which tended to get pretty muddy-
 
Before

It was also uneven after years of sinking in. Dave went and bought a couple more pieces of lumber to frame in the areas-


I suggested we widen the path, good idea!


So after Dave Tamped down the first layer watered it and let it sit overnight next he added the second layer of crushed stone. Watered it in and tamped it down. It turned out to be pretty loose still. After doing some research we decided it would be best to rent a steel gas powered tamper that we can press the stone a lot more and leave a much firmer surface. So the next day we went back to the rental place to pick the BIG one up. It looks like this-


It weighed a few hundred pounds and was very tricky to unload out of our Outback. We used two 2 x 4's  (my idea) to push it back up when done. NOT FUN, more of a 3-4 person lift!


Dave did the path several times, then we took back to the rental place, Dave watered well. 
All in all we love it! Dave did a great job, with me contributing more ideas.

All done!

There was a little mulch mixed in the rock in the two small areas, but we can live with it. It will bio-degrade over time. We'll use the 2 totes of mulch in the garden. Rosie the hen came to inspect-