Life on a little urban homestead in the making, with ideas for self-sufficiency, Permaculture, DIYing, organic gardening, food preservation, Chicken keeping, cookery, crafts, thrifting and more...

Dec 30, 2020

Making British Christmas Chelsea Buns, A Bowl Of Christmas Joy, Happy New Year!!!


My Chelsea Bun "tree"

Making British Christmas Chelsea Buns-
I  saw this a few years ago-


Rosie, the Scottish blogger I follow, make some amazing recipes! I decided to make this and see how it went. First I had to convert the measurements to American ones. Then I had to find certain ingredients. I had never worked with Marzipan before and unsalted Pistachios were a bit tricky to find. I will say this was the trickiest dough I've worked with, VERY sticky! It was hard to tell from the photo how big they'd be. I was thinking Danishes, but really more normal bun/biscuit-sized. It was a toss up to use American bread flour or American unbleached. I went with bread flour. I liked the combo of fresh and dried Cranberries, and orange. Here are my calculations on the measurements, feel free to do your own research for conversions. Detailed directions and photos on Rosie's blog- 

1.4 cups full-fat milk
3.48 TBL butter, chopped into cubes
1 and 8/10th cups  bread flour- NOT ENOUGH
7g sachet fast-action dried yeast
3.5 TBL white and brown sugar mixed,  plus 3 TBL 
1 Tsp ground cinnamon
Spray oil 
7 Oz.  Marzipan, chilled- 1 tube (this is hard to grate!) 
1 orange, zested and juiced
0.43 cup fresh cranberries
0.43 cup dried cranberries, plus 1 tbsp
1/3 cup pistachios, chopped
3 TBL apricot jam, sieved (I subbed Orange Marmalade) 
2/3 cup powdered sugar

I think if I made these again I would use quite a bit more flour. I did find several generic sweet dough recipes (see my Pinterest food folder) that might work better. Rosie's photos make the raw dough look thicker and mine rose plenty. It was pretty hard to handle, use LOTS of flour on your board and roller!!! 

Flavor-wise, excellent and a very different flavor profile.


A Bowl Of Christmas Joy-
I wanted something different for Christmas Eve dinner so I made beef stew. I used a basic (Martha Stewart) beef stew recipe with red wine. Simpler than the Beef  Bourguignon I had made in the past. I also added mushrooms, the last 15 minutes. It was warm, comforting and a bowl of joy! I served with hot French bread. I doubled the recipe so we had plenty for two dinners and some lunches. I made Molten Chocolate Baby Cakes for dessert, simple, fast and delicious! I used Nigella Lawson's recipe and it's great that you can make the batter ahead of time and chill until you need them  


Happy New Year!!!
Thanks for all your kind comments this last year, they really helped me feel connected! My family and I have much to be grateful for. Looking forward to this next year and all the exciting projects and adventures!!!

Dec 19, 2020

Holiday And Winter Decor


Holiday And Winter Decor-
We had snow, then a little warmer weather, rain 2 days agon, now mild and 45. More rain possibly in the next day or 2. Last weekend I made some Amish Baked Oats with some of my home-canned apples. It's great for dessert and breakfast! Lots of our own eggs now for these kinds of dishes now. I got 4 a couple days ago!!! We finally got everything up, excpet for a couple of inside window snowflake light string. Here's a peek at the rest!

I got my re-painted thrifted snow stake up. This summer I re-painted the eyes, cheeks and smile, the rest was okay. I also added new fabrics strips on the arms- 


New sign I got from Ace for the dining room-


My fave thrifted gingerbread couple! 


New cookie jar, love it!


New gnome with lighted LED wreath, cycles thru several colors. Love it on the kitchen counter! 


Tree's up, still wrapping things, mostly for our Grandsons-

Star fell off, the glue is drying! 


Hoping for some snow on Christmas! Monday is the Winter Solstice and the return of the light. Days will start getting longer!!! I'm ready. 

Dec 9, 2020

Restoring Vintage L.L. Bean Maine Hunting Shoes, Thrifting Find


Restoring Vintage L.L. Bean Maine Hunting Shoes-
You just never know when you'll run into something you been wanting! I'd been on the lookout for a used pair of L.L. Bean boots. They're pretty iconic, all made in the U.S., old school technology that still works. I gave up ever finding a pair in a thrift store or cheap on eBay. We were in a thrift store recently, I happened to go over to the shoe rack and saw this label-


I looked at them, stopped and thought, wait a minute! Maine? I took the boots off the shelf, looked inside and saw this- 


I thought these were L.L. Bean "Boots", but they were Maine Bean Hunting Shoes! These are the very first, original design, not Bean "boots". More flexible, thinner soles, more like a moccasin. Info here Wikipedia.org L.L. Bean They were a Men's eight (runs big), so I tried them on. They fit perfect. I didn't see a sticker on the boots and they were on a shelf that said $3 for all shoes, unless otherwise marked. I wandered around for a few other things and took them up to the front desk to pay for them. The woman clerk was upset at the register and said several times they weren't supposed to be out on the floor. She also asked if there was a sticker on them for another price and I said no. I kind of waited for her to veto this purchase but she said okay you're getting them for three bucks. She was not happy. It was obvious somebody made a big mistake there. So I bought them and took them home along with a couple of other things. Here's the before shots- 


The first thing I did was remove the laces, the insoles and took a good look. Next I cleaned the leather with saddle soap. I washed the rubber on the boots with warm soapy water. I let them dry overnight, here with wet leather-


Next I bought some Boot Guard leather conditioner that I had used years ago. The leather was really, really dry and stiff. I folded up a paper towel and started liberally applying it on all of the leather. I had to use my fingers to get in between the gusset under the laces. The gusset is what keeps all the water out of the boots, which is great! 

This next picture shows the difference after applying half of the conditioner on the leather-

What a difference the leather conditioner makes!


So both of the boots were done. I waited about an hour and added a second coat. A little later I touched up a few other spots with my fingertips


The leather softened up quite a bit! Buffed, came out with a nice patina!!!


The insoles were shot, stitched leather with something on top that looked like burlap-


I bought some black sheepskin liners, with a foam arch support. Fit perfect, warm and cozy! 


Got new laces, similar to what's used on the L.L. Bean boots. I found out the traditional laces on the Hunting Shoes are plain brown, but I like them! I emailed L.L. Bean and found out these are probably from the 70's /early 80's. I may get them re-done at some point. I could get the whole rubber bottom replaced for about $40.00 Not a big priority right now. The leather might also not be intact enough to re-do anyway. All done, the products I used are listed on the left sidebar. Ready for snow and rain!!! Apparently they are also big for preppy style, who knew? 


Thrifting Find-
When we were checking out with the boots, and a little flatware rack, I spotted this! It was in the glass case, for $4.00! It has multi-color LED lights that rotate the colors. It's about 6" long. My one Grandson love trains so I got it for our house for him to see. We love trains too however!  It's very bright, the photo was hard to pick that up. Just too cute to pass on! The lights go blue, red, dark pink and green-


Dec 3, 2020

Things I'm Grateful For, Easy Coop Winter Sunroom Upgrade


Things I'm Grateful For- 
I didn't really have time to do this before Thanksgiving since things were kind of crazy. Dave and I wound up having Thanksgiving by ourselves. We had a small turkey with all the trimmings, apple pie, and some nice appetizers, smoked Salmon, crackers, olives, pickles, meats and cheeses-


I have been thinking since summer how grateful I am for how things have been going for us and our family. So for (belated) Thanksgiving here's a few things I'm very happy and grateful for........


Both Dave and I have been able to stay fully employed with our jobs through Covid. I started working from home at the end of March, and I'm still working from home. It's nice, but there is a certain lack of communication in my organization. Working from home I think exacerbates that, not a surprise. I do have kitty to keep me company! 

I have a lovely view, can moderate the heat/cool as needed and it is a truly unscented workplace for me, which is awesome! 


I'm really grateful that two of my children and one son-in-law got much much better jobs this summer. With better pay and benefits! One was hired into my organization and the other two into a large national insurance company. They all are doing very well in their jobs and the pay raises they got were very helpful, since two of them have children. Kids can be expensive! 


Our house is doing well. We did have to replace our hot water heater (leaky pipe) recently but we were able to do that ourselves, so that saved a ton of money. It lasted 3 years past it's warranty too! After Dave drained it and we took it down it had 2 big rusted out areas on the back!!! Dave bought it, brought it home and with the help of my daughter put it in a place and it's working great. We saved hundreds and hundreds of dollars not getting it delivered and having a plumber install it. Dave had done it before so it was an easy install-

Leaky pipe


Dave added a heavier steel base and leak tray. Works great! He added earthquake strapping as well. 

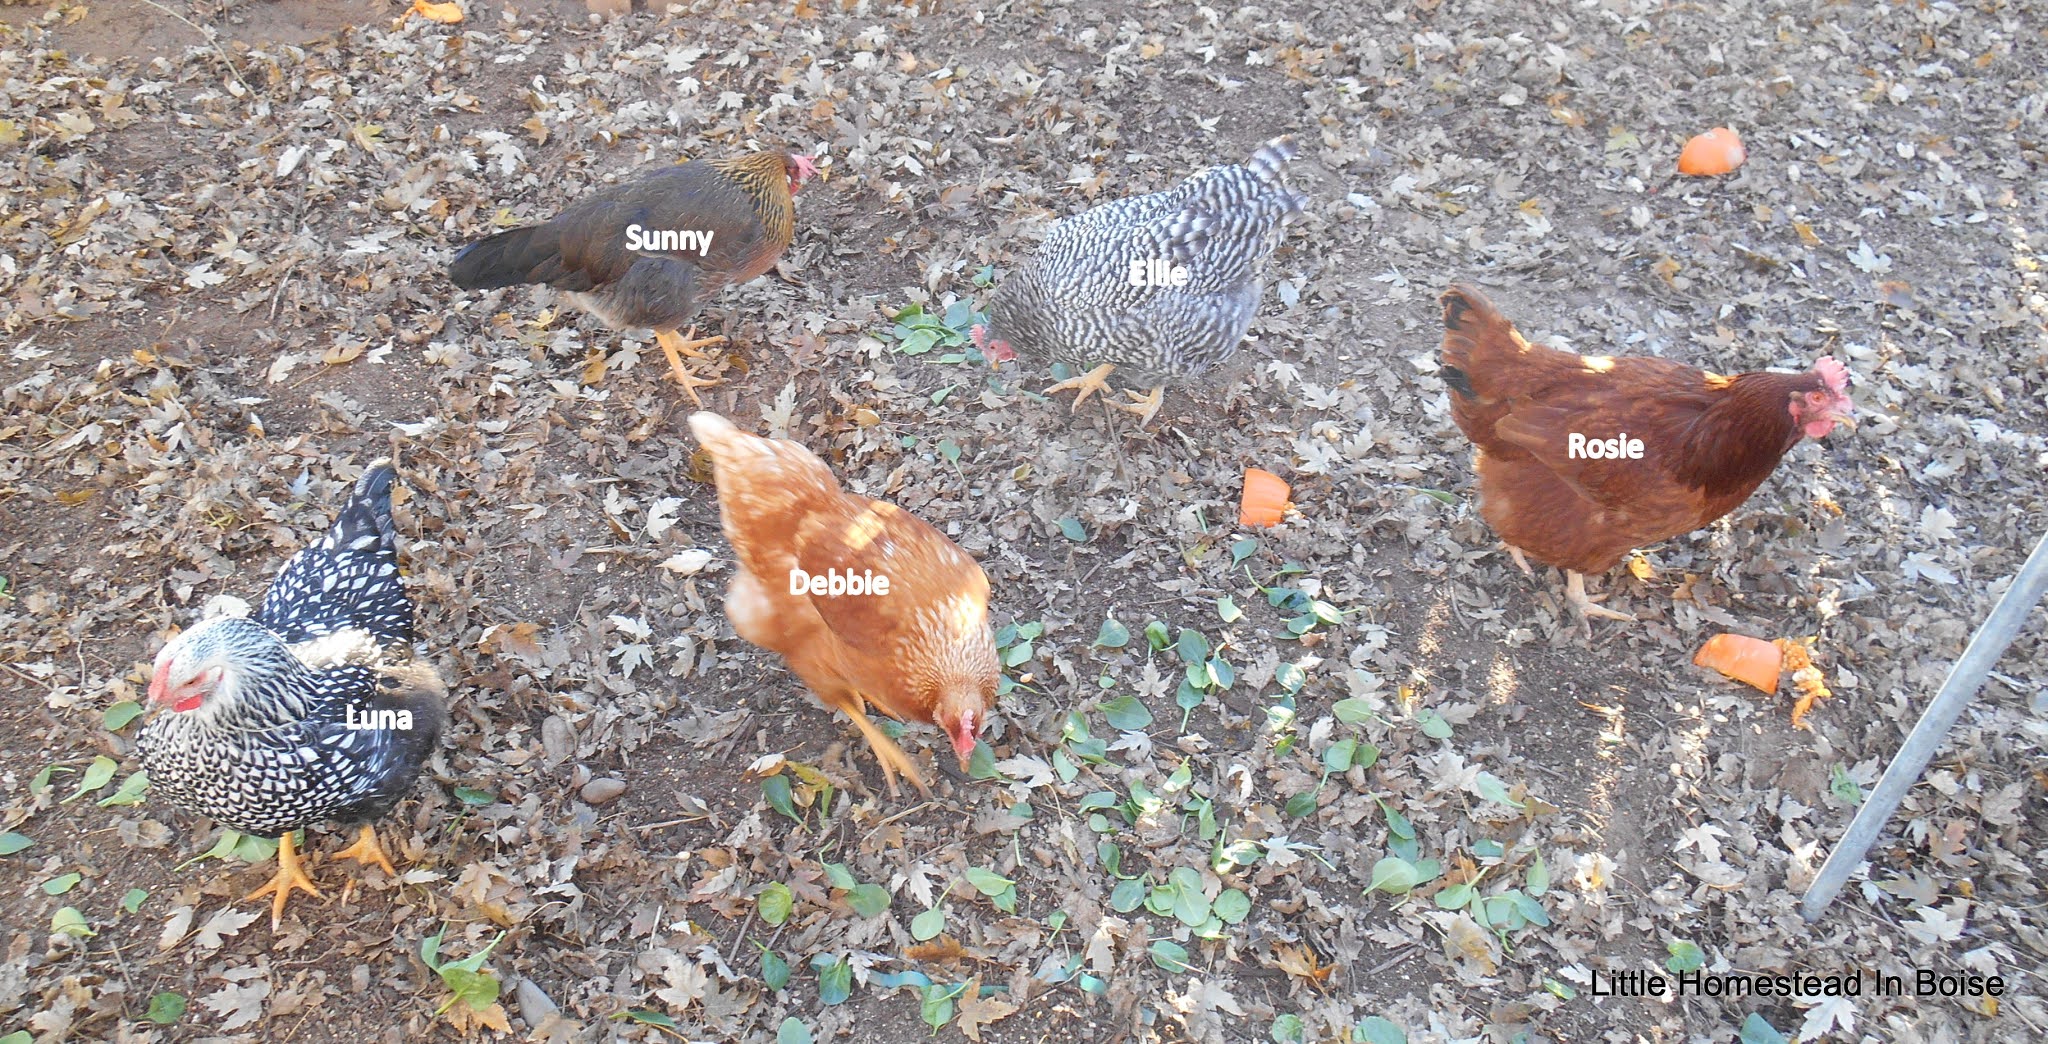
The chickens have done well. We now have a full size flock of five and the eggs kicked in a few weeks ago. They're averaging about two per day with the shorter days, here's the flock! 

We're happy that we live close to all three of our children. We see our two grandsons off and on which is great, they grow so fast. Oliver will be 4 in December!  River's 4 and 1/2 and doing really well in preschool, yakking up a storm. Oliver is doing great, loving preschool as well, spelling and loves reading! River came by recently, Mom Tami reading to him-


The garden did really well this year even though we got a really late start with the weird weather. No peaches sadly,  maybe about 10. We had a really small crop of apples, but the pears did great, enough to can! 

 I was able to freeze a lot of fresh organic tomatoes in our freezer, pretty full now! 

I'm a planner! When Covid hit I started buying a few extra meats here and there to freeze. Already used one beef roast-

I had a full body skin cancer check-up recently and I was really happy! I was completely clear, except for two little tiny spots on my nose (pre-cancerous). The dermatologist froze them off and hopefully that will take care of it. 

Dave and I just celebrated our 27th anniversary! I'm lucky to be married to my best friend and he's a outstanding father and grandfather. When I decided to get married I definitely picked the right person!


Easy Coop Winter Sunroom Upgrade-
We built our coop "sunroom" several years ago out of recycled glass panels, shower doors and a custom frame attached to the coop. Basically it gave more room for the chickens in the winter when it was really snowy or pouring rain. After all the years the pressure wood frame started rotting and we talked about what would be a better replacement. The glass was very heavy and it's really awkward to put together. Basically after the winter's was over we could take it down and store it. It did work great for heavy snowy weather! Original-


The other downside was it cut off the shade area in the winter, losing a bit more room for the girls. I mentioned this fall that I'd seen some other hoop houses that were used for chickens in the winter. I thought maybe it was time for a simple, low cost, easy re-do. Here's a few examples of my thinking, the first design that really got my attention several years ago- 

Two photos from Sugar Mountain Farm


Dave and I really liked the idea, with it being lightweight, easy to put up/take down, as well as inexpensive.  Dave shopped around and brought home his materials, total about $40.00.  He bought six x 10' long flexible 1/2 " white PEX tubing (for plumbing), a roll of heavy clear plastic and built a frame base of 2 x 4's we had. First he cleared out the old materials, then recycled them. Next he built a base of 2 x 4's, and attached the PEX to the coop using scrap wood with a hole it it. Next he created the shape. He attached the PEX pieces to each other form the shape with tie wraps and drilled holes in the 2 x 4's. He put the PEX in the holes to brace the PEX-   


It reminds me of an igloo! Note the gap on the left, allowing the hens to go behind the coop and have more room to roam-

Roll of plastic on the ground


Now getting ready to spread out the plastic. We spread it out, he cut it to fit, then stapled it down to the base of the 2 x 4's. It works great! The chickens have been using it in the pouring rain, wind and snow. I can't really see through it since the plastic isn't that clear.  I see them in there moving around and taking dust baths. It's nice to have that extra space when the weather is really nasty. In the spring we can just take it down and it goes back into garden growing space. Lightweight but doing the job! 


Related Posts Plugin for WordPress, Blogger...